记录一次失败的固件 fuzz
2021-01-21 #pwn #fuzz这是我第一次对华硕路由器的 httpd 进行 fuzz。结果 fuzz 出来的结果没有经过实机测试,就提交上去了,然后就是华硕的安全团队复现不出来...为什么复现不出来,在本文总结处进行分析。本文主要讲我在进行固件 fuzz 时的具体过程。
代码分析/逆向工程
华硕路由器的大部分源代码是公开的,可以在官网上下载到,并且有个开源的 RMerl/asuswrt-merlin.ng。阅读源代码发现, httpd 的源代码中间调用了些博通的库,没法直接用编译器进行插桩。所以就当作源码不存在,直接下载二进制文件进行无文件 fuzz 了...
2021 年 1 月 15 日,官网上突然载不到源代码了,所以请照着 RMerl/asuswrt-merlin.ng 项目进行代码审计。
这里选择的路由器是 rt-ac68u,使用了 ARM 架构的 SOC。
虽然引用了 OpenWRT 的链接,但是使用博通 SOC 的设备都不能刷 OpenWRT,因为(傻逼)博通对开源不友好
下载下来的 trx 文件可以直接用 binwalk 进行分析。看来用 binwalk -Me 直接就能解压出固件了。
解压完后在 squashfs-root/usr/sbin 文件夹下找到 httpd。
对照源代码和二进制文件,发现程序从 main 函数开始一个链接,将此链接的 fd 存在 conn_fp 中,然后进入请求处理函数 handle_request 进行解析请求。
if
;
;
;
之前爆出的漏洞很多都是在 handle_request 中的,并且这个函数的代码量比较大,简单的代码审计已经看不出问题来了...所以就对这个函数进行 fuzz。
模拟环境配置
跨平台编译链使用
这里我使用了 RMerl/am-toolchains。通过使用 LD_LIBRARY_PATH 指定链接库的位置,这样才能链接上相应的库。
出现隐式声明函数时,但是这个函数又是 GNU 标准实现的函数的话,可以试着加入下面这句宏定义到代码开头。例如我在编译 libnvram 时出现 警告: 隐式声明函数‘strndup’,加上下面这句宏定义就可以正常编译了。
出现 /dev/nvram: Permission denied
宿主机上肯定没有 /dev/nvram 啊,所以使用 QEMU 进行模拟时使用了 firmadyne/libnvram 这个库 Hook 掉 nvram 的相关操作,然后将这个库添加到 LD_PRELOAD 中。在使用时如果发现这个库没有创建 tmpfs 进行存储的话,那就手动用 sudo mount -t tmpfs -o size=10M tmpfs $挂载路径 创建一个。可以修改 config.h 实现将挂载路径放在别的目录下。例如我将挂载路径改动到了 /mnt/libnvram。
Hook __uClibc_main 直接调用 handle_request
根据 Modern Vulnerability Research Techniques on Embedded Systems 这篇文章,我通过 Hook __uClibc_main 来实现直接 fuzz handle_request 函数。
由于在解析 http 请求时,程序使用了 fgets 等 c 语言相关函数,所以我决定使用普通的文件流代替 TCP 流。
动态库的主要功能就是初始化被 fuzz 程序的相关变量,将 fuzz 的输入塞到程序中,然后运行函数,最后查看运行结果。
// gcc main_hook.c -o main_hook.so -fPIC -shared -ldl
// RTLD_NEXT is a GNU Extension
/* Trampoline for the real main() */
static ;
/* Our fake main() that gets called by __libc_start_main() */
int
/*
* Wrapper for __libc_start_main() that replaces the real main
* function with our hooked version.
*/
int
使用 qemu-arm 进行模拟
这里使用了 qemu-arm 进行用户态模拟,在 -L 参数中加上解压出来的 squashfs-root 的路径,并在 -E 参数后的 LD_PRELOAD 变量加上 Hook 的库。
如果出现下面的情况,那就手动写入到缺失的文件中。
)
当看到下面的结果时,说明程序真的跑起来了。
fuzz 前准备
获取输入数据
可以去别的项目中寻找他们的测试样例,然后用脚本提取出来。下面是提取 "http-parser" 这个项目的样例,并写入文件中。
=
=
=
=
=
= False
= 0
+=
= True
+=
=
+= 1
= False
获取字典
AFLplusplus/AFLplusplus 项目中的 dictionaries 目录中就有一些字典,可以拿来使用。
使用 ramdisk
由于 fuzz 比较消耗硬盘读写,所以通过下面的命令,使用内存盘减少硬盘消耗。
使用 AFL++ 进行异架构 Fuzz
AFL++ 是个不错的项目,扩展了原版 AFL,并且有详细的文档和样例代码(有这两项就已经超越了90%++的开源项目了)。
AFL++ 用了 git submodule 进行导入其他项目,编译时建议使用 proxychains 或者设置 http_proxy 环境变量来强制 git 走代理进行 clone,加快速度。其他的编译事项在 README 里写的非常详细了。我们需要 fuzz 的程序是 arm 架构的,所以在编译 QEMU 时加上 CPU_TARGET=arm 环境变量,指定 QEMU 编译架构。
最后就是运行 AFL++ 了。参数中 -Q 指定 QEMU 模式,-m none 指定内存限制为没有,-i 和 -o 对应的则是输入和输出。程序使用文件方式读入数据,所以最后加上 @@。
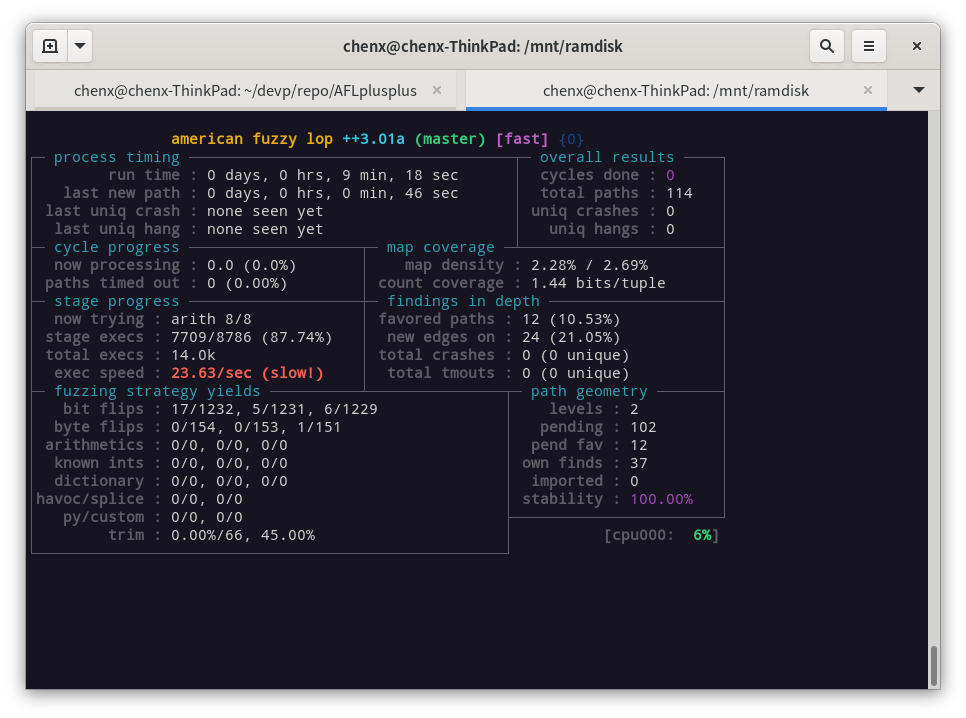
然后就是喜闻乐见的显示信息窗口了。
调试
对 qemu-user 进行模拟的程序,可以通过 -g 参数,开启 gdbserver,然后在本机使用 gdb-multiarch 进行调试。
先使用 qemu-arm 加上 -g 选项启动程序。
然后使用 gdb-multiarch $程序 和 target remote :$端口号 命令连接上 server。最后就是正常的使用 gdb 进行调试了。
等待完善的地方
在进行 fuzz 后,我发现 AFL++ 在 QEMU 模式下,也使用 Persist 模式,如果能使用 Persist 模式的话,可以大幅提高 Fuzz 效率。演示代码在 AFL++ 项目的 utils 目录。
使用 master/slave 模式启动多个 fuzzer 进行 fuzz,提高 fuzz 效率。
总结
这是一篇时隔几个月才写的复现文章,之前还是比较忙,所以没时间写文章。
在这几个月里,我突然明白了为什么报上去的漏洞别人复现不了,因为 firmadyne/libnvram 这个项目在 key 不存在时返回了 NULL,然后 httpd 中的部分地方又没有对值为 NULL 的情况做处理,测试时找的网络上的路由器可能存在着已经被新版本修复的漏洞,所以才会碰巧“测试成功”。然而真机在通常情况下存在这个 key,并且修复了大量的漏洞,所以复现失败。
当然,如果有人看完这篇文章,并且借助这篇文章的经验挖到了洞,能不能给我留个评论,让我膜拜一下...
refs
参考文章
Modern Vulnerability Research Techniques on Embedded Systems
提及/使用到的项目